Open1xSupplicant documents
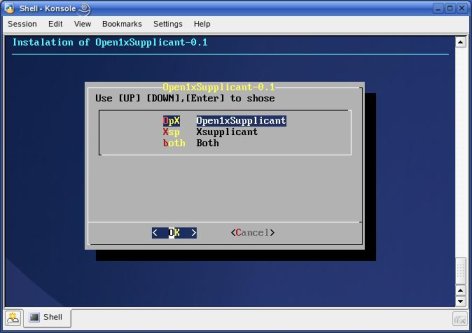
Open1xSupplicant installationTo initiate the installation of the Open1xSupplicant, follow the following steps:
To RPMs
- Download rpm from the page and then place it in a directory
- Use existing system installation utilities (eg: YaSt) for install RPMs
- In case of dont exist any utilitie, open a shell to write the fowlling command:
rpm -Uvh open1xsupplicant-x.x-x.x.i386.rpm
- If the previous procedure dont give any errors, it is now necessary to install the Xsupplicant, for this, follow the steps mentioned in the following phase, only opting to install Xsupplicant.
To the package TAR.GZ
- Download the tar.gz package from the page and put it in one directory (eg: /usr/local)
- After to download the package tar.gz, accede to the directory where it finds the package and decompress it:
tar -zxvf open1xsupplicant-x.x-x.x.tar.gz
- Accede the decompress directory open1xsupplicant-x.x-x.x
- Execute the installation script:
./install.sh
In this point, follow the installation indications been given thru this process.
- If the 4 point is impossible to execute in your system, execute the basic installation:
./basic_install
- In case of any reported error during the installation process, you can verify the log file install.log in decompress directory, the specific error. This error could be a missing compiler to compile the source code or a missing library (this are the most common reported errors). In this case, you must install the missing package and repeat again all steps.
- In this point, and if you don't have any error, the installation has been completed with success and is ready to work.
Open1xSupplicant usageTo start you only need to run the open1xsupplicant command in one shell or in X enviorment. 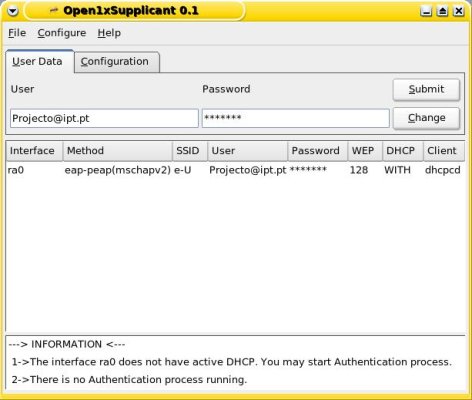 With this cenario, the user can put there own credentials (password and user name) in the wright spots to do the authentication process, change the register in Change button to the new modifications take efect and submit the parameters in Submit button, executing the Xsupplicant application to do one athentication process. 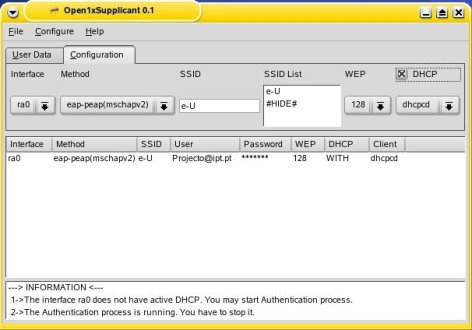 In this case, configure the network parameters like the network interface used to do one authentication process, the authentication method used, the network SSID (Service Set Identifier - it can be chosen by clicking on one of the SSIDs in SSID List) , the size of WEP (Wired Equivalent Privacy) key to the pre access of the network interface with the AP (Access Point) and if we want and what the type of DHCP (Dynamic Host Configuration Protocol) client in hour system. 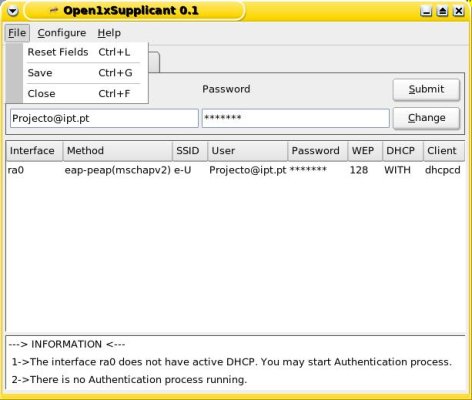 In this first menu, with Reset Fields menu, we can reset all fields in the application, with Save we can save the Xsupplicant configuration file with the user configuration parameters and with the Close menu we can close the Open1xSupplicant application. 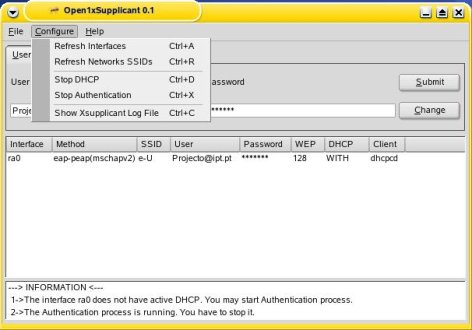 In the second menu, we can use this functions to prepare the network interface and other applications like DHCP client to make Xsupplicant work. With Refresh Interfaces menu, we can refresh the interfaces list in configuration tab, with Refresh Networks SSIDs, refresh the SSID list, with Stop DHCP, we stop the DHCP client deamon to this don't interfere with the Xsupplicant process. To we stop one Xsupplicant process, we have the Stop Authentication menu, this menu stop it immediatly to permit start a new Xsupplicannt process. For the last, the menu Show Xsupplicant Log File, is to show the Xsupplicant log file, to we see the Xsupplicant status in a authentication process. 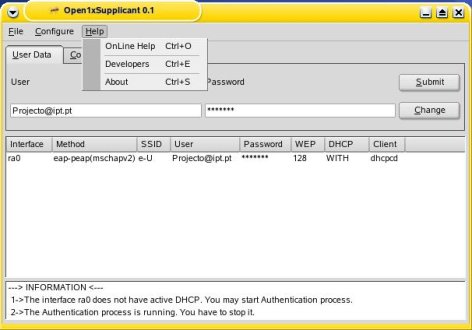 The last menu is a menu dedicated to the authors and the application itself. The menu OnLine Help open with Konqueror the project page to help users with any questions, the menu Credits, show information about the authors who develop this graphical interface, and the About menu show information about the application itself. 
PDF versionTop
|